Showing posts with label Cake. Show all posts

Monday, 25 September 2017

Chocolate Fudge Layer Cake with Vanilla Buttercream and Bittersweet Chocolate Ganache .

 
Last week in my Bakery Merchandising class, my fellow students and I spent hours preparing for a sale in the culinary school's retail bakery. One of my duties included piping huge swirls of fluffy vanilla buttercream onto dozens of yellow cupcakes, chilling them until firm, then suspending them upside down, one by one, and dipping them into a deep bowl of warm chocolate ganache.
At first my task progressed smoothly, but then the big white swirls started plopping off as I lifted the cold cupcakes out of the chocolate. Cursing under my breath with each failed attempt, I nervously fished out big globs of buttercream--once, twice, three times. Speed was of the essence that day and, not wanting to gum up the works, I took immediate steps to remedy the problem. Soldiering on, I carefully refrosted some of the cupcakes, chilled them longer, rewarmed the ganache, and crossed my fingers. 
Meanwhile, directly across from me a much younger student, who told me she'd been working in a bakery since high school, was deftly enrobing iced layer cakes in ganache. I kept glancing over as she ladled the fluid chocolate atop each cake, letting it move languidly down the sides before picking up a small offset spatula to cover any bare spots. Her sense of calm bordered on the meditative, and her technique produced beautiful results.

It made me want to do the same thing at home. Damn the cupcakes, I said to myself, full speed ahead with a big round layer cake in my own kitchen.

Thus was the inspiration for today's cake. (A cake that would, I believe, make a sensational Valentine's Day dessert!)
About this recipe . . .

From the book Welcome to Junior's! Remembering Brooklyn with Recipes and Memories from its Favorite Restaurant, this fudge cake is moist and densely textured. The recipe actually produces three hefty layers, but they were each so tall and obviously substantive, I decided to save and freeze the third one. If I'd actually used all three layers the iced and coated cake would probably have been 10" tall. (If you need a truly lofty layer cake, go ahead and use all three.) The vanilla buttercream recipe is also adapted from Junior's. The decision to apply a luxurious dark-chocolate ganache over the whole thing was, as you know, quite my own. 
I bought this book last April in Junior's Restaurant (the one in Times Square) during a trip to NYC, and I have to admit I'm pretty fond of it (the book, yes, and also the restaurant!). My family and I visited Junior's twice while we were there, one night just for dessert (that famous cheesecake, of course), and again on our last morning in town before heading to the airport. We'd finished breakfast and were getting up to leave when it hit me that I could not exit Manhattan without my own copy, bright stacks of which were displayed near the entrance. Along with solid recipes, this volume offers an honest and deeply affectionate homage to Brooklyn--as it was decades ago, and as it is now. It's full of historical tidbits that are pretty engrossing for anyone who's interested in the evolution of a classic, family-owned, American restaurant. I began reading it at the airport, while awaiting our flight, and hardly put it down until our plane landed back in Detroit. I used one of Junior's cute paper coasters as my bookmark
source here


Thursday, 21 September 2017

'CUP-PAKEN' - Miniature PIECAKENs with a delicious Chocolate and Cherry Combination

What's the cutest dessert you could make this year? A CUP-PAKEN - that's what! You may be asking yourself what on earth is a CUP-PAKEN? It is simply a mini version of a PIECAKEN, which is sometimes also called a 'pake' - so a CUP-PAKEN is a mini pie inside of a cupcake. 

So here is a recipe that will impress all of your friends and family. And stay tuned for more CUP-PAKEN recipes posted to this site in the future.

Recipe: Cherry Pie Inside of a Chocolate Cupcake
Topped with Dark Chocolate Ganache

Before You Start:


Make your ganache (see recipe below) one day in advance of making your cupcakes. Otherwise you might need a chocolate buttercream recipe or will have to wait a day to ice the cupcakes, but since cupcakes are only fresh for 2 days or so, it is best to make your ganache in advance.
You will need the following tools for this recipe: a regular 12-section cupcake pan for your cupcakes, and a mini 12-cup cupcake pan (or just use 12 sections of a 24-section mini cupcake pan) for your mini pies.

Mini Cherry Pies (Makes 12):
You need:
50 frozen or fresh (pitted) cherries
1/2 cup sugar
1/2 tsp cinnamon
1 tbsp. corn starch
2 tsp cold water

Mini Cherry Pie Instructions:

Make the Perfect Pie Crust (find the recipe here).
Cut 12 round pieces of pie crust using a small bowl or round 1 cup measuring cup. Cut another 12 smaller round pieces for your top crust (using a 1/4 or 1/3 cup round measuring cup - or any round glass about 2-inches wide). Set aside the smaller pieces.
Grease and then sprinkle flour in each section of a mini cupcake pan. Also grease the top of the pan, since each mini-pie crust may hang over a bit.
Press the larger circles of pie crust into each mini cupcake container.
Bake at 350 degrees F for 10 minutes. They do not need to turn brown, they just need to be cooked a little bit just to firm the crusts.
In a medium mixing bowl, mix together the cherries, sugar, cinnamon and the cornstarch-water mixture.


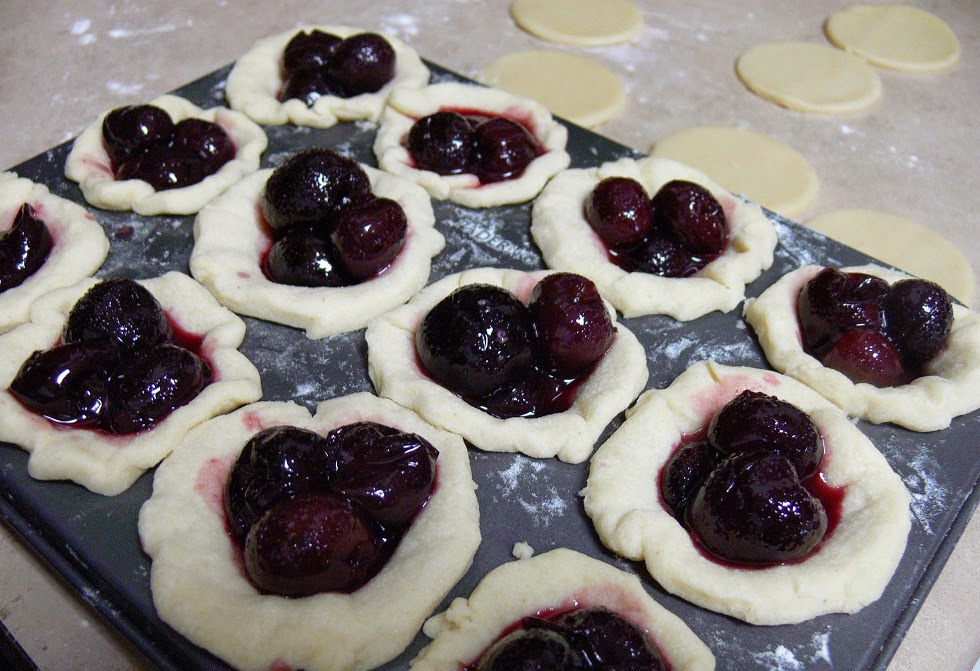
With a small spoon, scoop 3 or 4 cherries from the mixture into each mini pie shell. Place your small rounds of pie crust on top of each cherry pie. Use a fork to poke holes in the top of the crust.
You can seal the top and bottom crusts together by brushing on an egg wash (1 egg yolk whisked with 2 tbsps. water, milk or cream) and brush the egg wash over the top of the crust also to crisp and brown the pies. Although this is not necessary if you are putting the pies into the cupcakes.
Bake in the oven for 25 to 30 minutes at 350 F (until they are sizzling and browning slightly on top).
Once cooked, place on a cooling rack and let cool for 1/2 hour and then pop out each mini pie onto the cooling rack.


While your mini pies are cooling, make your cupcake batter:


Chocolate Cupcakes:

You need:
1 cup of unbleached flour
1/3 cup of sifted cocoa powder
1 tsp baking soda
2 eggs
1/2 cup of granulated sugar
1/4 cup of canola oil
1/2 cup of sour cream


Cupcake Batter Instructions:
Place the dry ingredients in a mixing bowl and mix until all ingredients are dispersed.
Add the canola oil and mix again until the mixture is dampened.
Add the eggs and beat until the mixture is mixed and lump free.
Stir or briefly beat in the sour cream until combined.
Line your cupcake pan with 12 cupcake papers.
Assemble the CUP-PAKENs:


Place your batter in a pastry bag and cut a small hole in the end (or place it in a large freezer zipper bag and cut a small hole in one corner).
Place a small amount of batter into the bottom of each cupcake paper, just to cover the bottom with a layer of about 1/4" to 1/2" thick.
Pick up your mini pies and press each one into the cupcake batter.
Pour a little more cupcake batter onto the top of each mini pie and fill in around the edges, and then smooth out the top (see the photo on the right for a visual guide).
Bake at 350 degrees F for 15 minutes, or until a toothpick comes out clean. Do not over-bake.
Let cool completely on a cooling rack. This will take longer than regular cupcakes take to cool, since there is a small pie inside. Ice these once they are cooled and consume within 2 days or freeze in an airtight container until ready to eat.

Dark Chocolate Ganache Recipe:


You need:
1 cup of whipping cream
8 ounces of semi-sweet dark chocolate (chocolate with anywhere between 50% and 65% cocoa solids will do), chopped into 1/2 to 1 inch cubes.

Instructions:
Place your chocolate in a stainless steel or glass bowl.
Place your whipping cream in a small saucepan on the stovetop.
Bring the cream to a near-boil (not boiling) on medium-high heat.
Immediately pour the cream over the chocolate and stir with a wooden spoon until smooth.
Cover with an airtight lid or seal with plastic wrap and let rest on the counter overnight or for 8 hours.
Place in a piping bag to decorate your cupcakes. If it is too stiff, you can massage the bag with your hands until the ganache is soft enough to use. Alternately, you can whip this ganache with a hand mixer or stand mixer until fluff

source here

Monday, 10 July 2017

Banana Bars with Browned Butter Pecan Frosting


Banana Bars with Browned Butter Pecan Frosting (Adapted from Land O Lakes)

For the cake

2 cups all-purpose flour
1 teaspoon baking powder
1/2 teaspoon baking soda
1/2 teaspoon salt
12 tablespoons unsalted butter, softened
1 cup granulated sugar
1/2 cup packed brown sugar
2 large eggs
1/2 cup sour cream
1 cup mashed ripe bananas
1 teaspoon vanilla

For the frosting

4 tablespoons unsalted butter
2 cups confectioners' sugar
3 ounces cream cheese, softened
1 teaspoon vanilla
1/8 teaspoon salt
1/2 cup chopped pecans, toasted

To make the cake

Preheat oven to 375

In a medium bowl, whisk together flour, baking powder, baking soda, and salt.

In a large mixing bowl, beat together butter and sugars until creamy. Add eggs, one at a time, mixing until combined. Add sour cream, mashed banana, and vanilla - mix until well combined. Add the dry ingredients and stir just until combined.

Scoop the mixture into a 10" x 15" baking pan coated with nonstick spray - spread the top smooth with an off-set spatula. Bake until golden and a toothpick placed in the center comes out mostly clean with a few moist crumbs attached, about 18 to 25 minutes. Place on a wire rack and cool completely.

To make the frosting

In a small saucepan, melt butter over medium - continue to cook, stirring constantly, until the butter releases a nutty aroma and just starts to turn golden about 5 to 6 minutes. Remove and let cool completely.

In a small bowl, mix together browned butter, confectioners' sugar, cream cheese, vanilla, and salt until well combined and smooth. Spread frosting over the bars and sprinkle with pecans.

Tuesday, 27 June 2017

Cake Chocolate Lemon


Today the last of the cakes I served during Easter (her when it was ...) Bittersweet pastry, rich in chocolate flavor, saturated with sweet and sour lemon syrup. Quite heavy, damp cakes matched perfectly with delicate, cream cheese lemon cream with a structure of bird's milk. It was a sweet-type brownie, a little cheesecake, but with a slightly refreshing accent.

Ingredients for chocolate cake:
Chocolate base:
¾ cup of oil
½ cup of water
1 cup sugar
5 teaspoons cocoa
All the ingredients are put into the pot, stirring constantly, heating to dissolve all ingredients (do not cook too long). Studzimy.
sponge cake:
5 eggs
½ cup of sugar
1 ½ cup of wheat flour
1 teaspoon of baking powder
1 teaspoon of soda
We separate the proteins from the yolks. Mix it with sugar for stiffness. We add yolks and mix at the lowest speed. Then pour the cooled chocolate base (note if it is too thick mix 2-3 tablespoons of biscuit weight and just pour). Gently mix the mixture. Next, we add the sifted flour with soda and powder and mix thoroughly. Pour into a sheet of paper lined with baking. We cook 40-45 minutes at 180 degrees.We sleep and cut into 2 equal counters.

Ingredients for cheese and lemon:
500 g of white cheese twice ground
450 g cream 18% fat
2 cream "Snow" powder
2 lemon jellies
4 teaspoons of gelatine mashed in ¼ cup of hot water
5-6 tablespoons icing sugar
We jelly in 2 glasses of water. We set off for half-time. We whip cream with "Snow" and powdered sugar. We mix with crushed jelly and gelatin, the mass at the beginning will be quite rare, but after adding gelatin and jelly it will start to thicken - I put the bowl in the sink with cold water and mix thoroughly * can also help the mixer * "Foam consistency").

Saturday, 24 June 2017

Baklava Doll with Pralines


Materials:
1 packet of baklava yufka
Slightly less liquid than 1 cup of water
1.5 cup water

Inside material:
500 gr ground beef
2 medium onions
3-4 tablespoon oil
1 tablespoon butter
Salt, pepper
1 cup glass of currant
1 tablespoon tomato paste
1 egg yolk and 2 tablespoons oil on top
Preparation: Cut the onion finely and take a pot with the oil, add 5-7 minutes, add the meat and the salty, add the black pepper and the grape and add the green pepper and avocado and wait for a side before the cold. )
Mix water and oil in a bowl.
Spread 1 lozenge baklava from a liquid mixture on a loincloth. Spread a curved filo and crawl again from the liquid mixture. Spread the loaf on the long edge of the loaf and wrap it in a roll. Then wrap it around yourself and give it a rose shape.
Before giving it to the oven, mix the egg yolks and the oil mixture and cook until 180 ° C in the oven

Friday, 23 June 2017

Brazilian chocolate cake


A very popular cupcake recipe in Brazil and Portugal. This time it's a chocolate cake with the sonorous name "Nega Maluca". His story goes back to the times of slavery in Brazil when an African slave was sold to a wealthy family living in São Paulo. Once she cooked an ordinary "light" wheat cake when she accidentally spilled cocoa into a bowl with a dough. At first, she was frightened but still decided to bake a cake in this form. And the result surpassed all her expectations!
She herself did not speak Portuguese at all and no one understood her. Therefore, she was given the nickname - Nega Maluca. Maluca means "crazy", "reckless." Hence the name of this cupcake.
In Russia, a similar principle of making a chocolate biscuit, called "chocolate on boiling water." And it is very similar to the American "chiffon" biscuit, which is prepared with the addition of vegetable oil. The cake is very lush, soft, porous. And it can serve as an excellent base for any biscuit cakes and pastries.
Traditionally, the top of the "Nega Maluca" cake is covered with either chocolate glaze or the so-called "brigadier" cream. The second option seems to me more interesting and tasty. That's it I'm offering you today ... :)

Ingredients:
Dough:
4 eggs
1 and 1/2 cups of sugar
2 cups of flour
1 cup vegetable oil odorless
1 cup of cocoa
1 cup boiling water
1 tbsp. Baking powder

Chocolate cream:
1/2 cans (195 g) of condensed milk without adding vegetable fats
6 tablespoons cocoa
6 tablespoons Milk
1 tbsp. Butter

Preparation:
1) Dough: Heat the oven to 180 ° C. Rectangular shape (~ 20x30 cm) grease with oil and sprinkle with flour. In a bowl, mix the sugar, sifted together with flour, cocoa and salt, and vegetable oil. Add hot (almost boiling) water, eggs and baking powder, and mix properly until smooth. Pour the dough into prepared form, surface with a shovel and put into the oven. Bake for about 40 minutes. Willingness to check with a wooden skewer. Ready cake to cool and remove from the mold.

2) Chocolate cream: mix all the ingredients in a saucepan and put on a fire. With constant stirring, bring the mass to the desired density. The resulting cream to cover the cake.

Wednesday, 14 June 2017

Pumpkin Floor Laying Sweet


Materials:
3 pack oat biscuits
100 gr butter
1 kg shells peeled cube cubes chopped honeycomb
2 cups of powdered sugar
Half a teaspoon of water

For cream:
1-liter milk
2 crumbling meal spoon flour
2 crumbles meal spoon starch
1 cup of powdered sugar
200 ml cream
1 packet of vanilla
1 package plain cream shaker + 1 water glass cold milk
Walnut

Fabrication:
Put the honey beaker in a pot of water and sugar and cook the pumpkin until it softens. Pass the sauces through the robots and mix with the melted butter. Place the biscuit press on the bottom of a handcuffed mold (I used a rectangular mold). Remove all the ingredients except the liquid cream from the ingredients needed for the cream. Add cream and mix for 5-7 minutes. Pour the cream on top of the cookie base. Spread the zucchini that is baked afterward and spread on the puddings. Spread the cream over the pudding and spread it over the top and wait for 2-3 hours in the cupboard. Spruce

Tuesday, 13 June 2017

Cheesecake ( Gouda )

I do not really like this expression for being too naturalistic, but it suits well for this cheesecake: you can eat it with your lips! :) So it is a delicate dessert ... Air cheese soufflé on a light coconut biscuit with pieces of juicy pineapple, is decorated with a scattering of tropical fruits. The cake literally melts in your mouth!
I saw the recipe several years ago in a culinary program, then many times I saw its analogs on the Internet and today I present to you my version of this amazing cheesecake with a Dutch accent)). Well, if it is cheesy, then I wanted to decorate it, respectively. Figures from white tempered chocolate, resembling pieces of cheese, gave a unique look to this, in fact, a very simple and homemade cake. :)

Ingredients:
Coconut Biscuit "Gioconda":
77 g of sugar
25 g of fine coconut shaving
2 eggs (to separate proteins from yolks)
1 yolk
A few drops of coconut essence
32 g of corn starch
30 g of flour
20 g melted butter

Cheese souffle:
200 ml milk
75 grams of Gouda cheese (cut into small cubes)
100 g of sugar
1/4 vanilla pod
2 tablespoons Flour
4 eggs
90 g of soft butter
a pinch of salt
5 rings of pineapple (fresh or canned, or any other tropical fruit)

Decoration:
Apricot or pineapple marmalade/confiture
White chocolate
Pieces of tropical fruits (fresh or canned)
Whole and ground pistachios
Food Gold (optional)

Preparation:

1) Coconut Biscuit "Gioconda": Heat the oven to 180 ° C. Silicone form with high sides of 18-20 cm in diameter is lightly oiled. Mix 40 g of sugar with coconut shavings and yolks. Beat to a light fluffy foam. Add the coconut essence. Whip the whites with the remaining sugar until the firm forms of the peak. Flour with starch sift and alternately with whipped whites add to the yolk cream. Mix gently with a spatula. At the end, add the melted butter. Mix. The resulting dough is put in a prepared form, the surface is leveled. Bake for about 20 minutes. Willingness to check with a wooden skewer. Cool, remove from the mold. Wash the form, dry it and put a baked biscuit into it again.

2) Cheese souffle: milk together with vanilla seeds, warm in a water bath, add cheese and stir until the cheese melts. Mix the flour with sugar and add to the hot mixture, intensively interfering with the whisk so that no lumps form. Add the butter, mix until smooth. Remove the mass from the water bath, add the yolks, one at a time, carefully stirring after adding each. The resulting mass cools a little. Squirrels whip with a pinch of salt until the stable forms of the peak and gradually, little by little, introduce them into the main cheese mass. Mix gently with a spatula.

3) Assembling: put pineapple ringlets (or any other tropical fruits) on the coconut biscuit, top with cheese souffle. Bake in the oven on a water bath (in a deep, wide pan or pan to pour hot water so that it reaches half the form with cheesecake). Bake for about 1 hour. The finished cheesecake should be cooled and put into the refrigerator for several hours, without taking it out of the mold.

4) Decoration: remove the cheesecake from the mold, and apply a thin layer of melted with a little water confiture. Boca decorates with milled pistachios. On the top put pieces of fruit, pistachios (lubricate them, too, melted confiture) and white chocolate triangles, reminiscent of its shape pieces of cheese. Also, if desired, you can decorate with leaves of food gold. Keep the cheesecake in the refrigerator, covered with a glass cap.

Sunday, 11 June 2017

Mango Mousse Cake This is a killer dessert


This is a killer dessert. It's a little time consuming to prepare, but so worth it! I'm giving you the ingredients and a link to all of the recipe instructions: tatyanaseverydayfood.com/recipe-items/mango-mousse-cake. 

INGREDIENTS
Sponge Cake 
3 large eggs
1/3 cup sugar
1/2 tsp. vanilla extract
1/2 cup flour
1/2 tsp. baking powder

Mango Mousse
2 cups heavy cream
1/2 cup sugar
1 tsp vanilla extract
12 ozs whipped cream cheese
2 large mangos peeled and chopped
1/2 cup sweetened condensed milk
Peach food coloring (optional)
1/4 cup water
2 packets unflavored gelatin
For Garnish
1/3 cup mango nectar or juice
3 oz package peach flavored Jello
Fresh fruit and berries

Watch Video: 

Saturday, 10 June 2017

To make this cake, you do not need any sophisticated and exotic products.

Only the usual ingredients - flour, sugar, sour cream, condensed milk ... But, what a result! Great! The cake is delicious! And what an incredible incision!
The only thing, according to this recipe, I got instead of 12-15 cakes ... 17. I carefully read the description of the preparation ... And covered the cream on top with cream (from butter and chocolate in equal quantities and decorated with bezesskami)

Ingredients:
For the cake:
2 eggs
100 g of sugar
100 g sour cream
100 grams of butter at room temperature
3 glasses of flour + on a dust
1/2 tsp Soda

For cream:
400 g sour cream
1/2 can boiled condensed milk (can be more)
For sweet tooth, you can add a little sugar or cream or dough.

Preparation:

1. Wipe the sugar with butter, add eggs, sour cream and soda. Good to mix. Gradually add flour. You can add a little less than 3 glasses. The dough should be a little softer than the dumplings. Remove for 30 minutes in the refrigerator.

2. Divide the dough into 12-15 slices and roll it out thinly, if necessary adding flour. It is most convenient to roll the crusts directly on the baking paper. Cut the size of the cake can be both at the stage of rolling and after baking. The latter option seems to me more convenient. Before baking cakes pierce in several places with a fork.

3. Bake cakes at a temperature of 190 degrees until a slight blanching (about 3-4 minutes). Do not overdo it, otherwise the cakes will be dry. Cut the hot cake by template. Remove trimmings for sprinkles. I obtained 13 cakes with a diameter of 21 cm + trimming, which the children were re-polling.

4. For cream, whip the sour cream with boiled condensed milk. You can adjust the sweetness and consistency by using a portion of the condensed milk in the cream. The cream should not be dense or liquid. He should lie down well, not flowing out, and at the same time should well soak up neutral cakes.

5. Leave the cake at room temperature for 3 hours, and then rearrange it in the refrigerator, preferably overnight.

Friday, 9 June 2017

Slow Cooker Chocolate Lava Cake


RECIPE:
Here's what you need-
- 1 chocolate box cake + corresponding ingredients
- 1 package of pudding + corresponding ingredients
- Some semi sweet chocolate chips
- Optional: vanilla ice cream

Instructions: Mix chocolate box cake and pour into slow cooker. Then mix box pudding and layer on top of cake mix. Sprinkle as many chocolate chips on top as you like. Cook on high for 2 1/2 hours. Enjoy on it’s own or with vanilla ice cream.

Watch Video :) 

Thursday, 8 June 2017

Peanut Butter Jam Mug Cake decorated with whipped cream, blueberries and jam


Ingredients 🌟
1. Flour 4 tbs
2. Baking Powder 1/4 tsp
3. Sugar 4 tsp
4. Milk 4 tbs
5. Peanut Butter 3 tbs
6. Whip Cream for topping
7. Strawberry Jam
8. Dried Blueberries

Let's Get Baking!1. Mix flour, baking powder sugar, milk and peanut butter.
2. Pour ingredients into a mug and bake in microwave for 1-2 minutes on medium power. 
3. Decorate with whipped cream, jam, and blueberries.

Watch Video

Wednesday, 7 June 2017

These ice cream cones are actually cookies and cream cupcakes.


INGREDIENTS
For the cupcakes:

  • 20 flat-bottomed cake cones
  • 1 box white cake mix
  • 3 large eggs
  • ⅓ cup vegetable oil
  • 12 Oreos, crushed

For the topping:

  • 1 8-ounce tub Cool Whip
  • 12 Oreos, finely crushed


PREPARATION

For the cupcakes:
Preheat the oven to 350°F and place the cake comes in two 9 x 9-inch cake pans so that they’re touching and propping each other up. 
Combine cake mix, eggs, and vegetable oil in a large bowl and beat until smooth. Add the Oreos and stir to combine. Divide the batter among the cones in the baking pan, leaving at least ½-inch at the top of each cone. Bake in the preheated oven until the cupcakes are puffed and springy, 18 to 20 minutes. Let the cupcakes cool completely before topping.
For the topping:
In a large bowl, gently stir together the Cool Whip and the Oreos. Transfer the mixture to a large, airtight plastic bag or a pastry bag. Cut an opening 1-inch wide in one corner of the bag, then pipe the topping in a spiral onto each cupcake, to look like an ice cream cone.

Watch Video Final ;)

Tuesday, 6 June 2017

Ice Cream Pie


INGREDIENTS
  • 13 ½ tablespoons water
  • ½ cup cocoa powder
  • 1 ½ cup sugar 4 tablespoons +
  • 28 oz sweetened condensed milk
  • 1 ¼ cups milk
  • 3 eggs
  • 2 teaspoons of vanilla extract
  • 10 ½ oz heavy cream

STEPS
In a pudding mold, add 1 cup of sugar and cook to caramelize.

In a small saucepan, add water, cocoa powder and 4 tablespoons of sugar. Mix and cook over medium heat until the sugar melts and forms a syrup.

Pour the mixture into the pudding mold and store in the freezer for 30 minutes.

In a saucepan, add condensed milk, milk, 3 egg yolks and vanilla extract. Cook over low heat, stirring constantly until thicker cream forms. Reserve.

Beat the egg whites and slowly add the remaining sugar.
Incorporate the condensed milk cream gently.


Thursday, 1 June 2017

Cook by his recipes

And one more little masterpiece from Hidemi Sugino)). Cooking by his recipes is an incredible pleasure! His biscuits and mousses are perfections! There is even such an opinion that if Pierre Erme is the king of macarons, then Hidemi is the king of the mousses. And it's hard not to agree with this ...)
Cakes "Sicily" - this is the most delicate pistachio sponge cake, familiar to us already on the cakes "Ambrosia", light blackberry mousse on Italian meringue and the most delicate pistachio mousse ... As you know, the best pistachios in the world are Sicilian, hence the name . The dessert is rather simple both in composition and in execution, but absolutely perfect to taste! :)

Ingredients:
Pistachio Sponge Cake:
90 g of almond paste/marzipan 50%
37 g of pistachio pasta
45 g eggs
40 g yolk
25 g of protein (1)
80 g of protein (2)
50 g of sugar
45 g of corn flour
20 g melted butter

Syrup for biscuit impregnation:
40 g of syrup 30 ° Bome (25 g of water + 33 g of sugar)
20 g of water
25 g of kirscha

Blackberry mousse:
90 g of cream 35% (whisk)
90 g of blackberry flesh
30 g of Italian meringue *
4 g of sheet gelatin
18 g of raspberry liquor
20 g strawberries (I have a blackberry)

 Italian meringue:
15 g of water
60 g of sugar
30 g of protein

Pistachio mousse:
225 g cream 33% (whisk)
22 g of pistachio pasta
225 g milk
50 g of yolk
1/4 vanilla pod
50 g of sugar
5 g of sheet gelatin
Neutral gel
blackberry
Pistachios

Preparation:
1) Pistachio sponge cake: heat the oven to 230 ° C. Cover the baking sheet with baking paper or a silicone rug. In a bowl, mix pistachio paste and grated marzipan. Add yolks, squirrels (1) and eggs. Beat to a homogeneous consistency. Add sifted corn flour and warm melted butter. In a separate bowl, whisk the squirrels (2), gradually introduce sugar and continue whisking until the stable forms of the peak. Gently mix the proteins in the bulk and mix with a silicone spatula. Distribute the dough evenly over the baking sheet, put in the oven and bake for 5-6 minutes. Ready biscuit cool and cut out of it small circles, with a diameter slightly smaller than the molds or rings for assembling cakes, somewhere about 4 cm.

2) Syrup for impregnation of the biscuit: add cold water and kirsch to the cooled sugar syrup.

3) Blackberry mousse: soak the gelatin in cold water. Flesh/puree blackberries to heat on a small fire and dissolve in it soaked gelatin. Leave to cool down. Prepare an Italian meringue: in a small container (for example, in an enamel mug) combine sugar and water. Put on a small fire and, stirring occasionally, cook the syrup. At this time, start whipping the protein until a lush foam, but not pere ZB vat. When the syrup reaches 118-120 ° C, remove it from the fire and pour it into the whipping protein with a thin trickle. Continue to whisk the whole mass at maximum speed until dense peaks and until the protein cools. Add the liquor, meringue and whipped cream to the cooled berry mass. The resulting mousse is laid in a layer about 2 cm thick in a square frame for cakes or in a silicone mold with a size of 20x20 cm. Put it in the freezer. Then from the frozen billet cut out small circles of the same diameter as the biscuit.

4) Pistachio mousse: soak the gelatin in cold water. Whisk the yolks with sugar. Milk mixed with pistachio paste and vanilla, bring to a boil, remove from heat and pour a thin trickle into the yolk mixture. Pour everything back into the pan where the milk was heated and, with constant stirring, bring the mass to a light thickening (85 ° C). Remove from the plate and, if necessary, strain through a sieve. Add the soaked and wrung gelatin. Cool and gradually, in several stages, to introduce whipped cream.

5) Assembling: put a layer of pistachio mousse on the bottom of silicone molds or metal cake rings. Top out the frozen blackberry mousse. Lightly press it. Next, put each strawberry into one strawberry berry (I have blackberry slices). Next - again a layer of pistachio mousse. Pistachio sponge cake should be soaked on both sides and put on top of the mousse, slightly pressing it. Obtain the resulting blank.

6) Frozen cakes covered with neutral gel and decorate with fresh blackberries and pistachios.


Wednesday, 31 May 2017

Portuguese cream cakes - Pastéis de nata

How long have I not cooked them! Bitch, as I wanted!)) I adore them almost more than anything that exists in this infinitely beautiful and sweet confectionery world!)) This time I prepared a simplified version, in the sense that the cream for cakes is prepared much faster Than in my previous, more traditional variant, but on taste, it precisely does not affect the worst. Cakes are delicious!
By the way, I can not but share: recently quite by accident discovered that the delicious pastéis de nata can now be bought in Moscow, these talented guys!)). In the near future, I plan to treat with pleasure and compare with my own! :))
Portuguese cream cakes II

Ingredients:
450 grams of puff pastry ready or homemade

Cream:
500 ml of cream 35%
200 g of sugar
8 yolks
2 tablespoons Flour
Thinly peeled skin of 1 lemon
Powdered sugar or ground cinnamon


Preparation:
1) Cream: in the saucepan combine all the ingredients, mix thoroughly with a whisk and put on medium heat. With constant stirring, bring the mass to a boil and thicken. Remove from heat, pour into another container, strain through a sieve and remove lemon peel. Tightly press (with touch) the food film and cool at room temperature until the warm state.

2) Puff pastry thinly roll out. Cut the circles of the required diameter, spread on the bottom and sides of the molds (fit cake molds). Lubricate pre-shaped oil with no need. Stab the bottom of the dough with a fork.

3) Heat the oven to 260 ° C (maximum temperature in the gas oven). Cool the cream on the molds and put the bake for 15 minutes to a bright golden color.

4) Cool the cakes, then gently remove them from the molds with a knife and sprinkle with powdered sugar or ground cinnamon before serving.

Monday, 29 May 2017

Bolo vegano de chocolate e laranja

Regardless of whether you are vegetarian or not, this luxurious truffle cake is sure to be enjoyed by all chocolate lovers and chocolate desserts. As you have already noticed, I very much like to experiment with various alternative recipes (without eggs, lactose and animal fats) and when it comes to something particularly successful, I rather hasten to share my experience with you. I will note that this recipe is absolutely universal and you can experiment with additives as you like: for example, instead of an orange you can take a cherry, cook it, as in the recipe for a cake "Black Forest" and it will be no less, and maybe even tastier! In general, dream! :)
Vegan chocolate and orange cake

Ingredients:

Chocolate biscuit:
2 tbsp. Flour
6 tablespoons 100% cocoa
4 tsp Baking powder
1 tbsp. Brown sugar
2 cups of warm (!) Coconut or soy milk

Orange syrup:
80 ml of orange juice
~ 50 g of sugar (or to taste)

Chocolate orange mousse:
1 and 1/2 St. Smooth soft tofu (not granular)
1/4 of warm water
2 tsp. Vanilla essence
200 g dark chocolate
3 tablespoons Sugar demerara (or to taste)
2 tablespoons Glucose syrup
Peel 1-2x oranges
Orange slices (without white film)

Candied orange slices:
1 orange
225 g of sugar
125 g of water
Dark lactose-free chocolate
Orange peel

Preparation:
1) Chocolate biscuit: warm oven to 180 ° C. Apply a vegetable oil to the tall form 20-22 cm in
diameter. Flour, cocoa and baking powder to sift into a bowl. Add the sugar. Mix.
Pour warm coconut milk and mix everything quickly by hand, without whipping.
Put the dough in a mold, smooth the surface, put it in the oven and bake ~ 30-40 minutes (depending on the shape and the oven). Willingness to check with a toothpick. Ready biscuit completely cool.

2) Orange syrup: mix orange juice with sugar in a saucepan, put on a stove, bring to a boil and until the sugar is completely dissolved. The resulting syrup completely cool.

3) Chocolate orange mousse: melt the chocolate in a water bath. Tofu cut into cubes. In the blender bowl, mix the water, vanilla essence, glucose, sugar, tofu, orange peel and melted chocolate. Beat to a smooth consistency.

4) Assembling: sponge cake trimmed, cutting off the top. Split along into two parts. Saturate with orange syrup the lower cake. Lubricate with a thin layer of mousse, top out the orange slices and then again the mousse layer. Cover with a second crust. Also, soak it and lubricate the remaining mousse top and sides of the cake. You can immediately sprinkle grated chocolate with orange peel. Put it in the refrigerator.

5) Candied orange slices: Cut into orange thin slices, remove bones. Dissolve sugar in water on low heat in a thick-bottomed pan or saucepan. Boil 2 minutes, then dip into a boiling syrup of orange slices and boil them for 30-40 minutes until the slices become almost transparent. Let them cool in syrup, then put on a grate and let it freeze. Decorate them with cake before serving.